
Contribute to ZappaFrenzy’s database

The ZappaFrenzy discography would not have grown this extensive without contributions from collectors all over the world. Only official 45s are listed here — bootlegs, unofficial, or unauthorized releases will not be included.
You must have access to the single you are submitting images and information for. Please do not use images found on the internet.
ZappaFrenzy focuses on 7″, 10″, and 12″ singles featuring Frank Zappa in one way or another. CD singles, cassingles, acetates, related labels, and related artists are not accepted at the moment.
If you would like to contribute, please review the guide below before submitting images, runout information, and other details.
7″ Images
The best way to capture images of a 7″ single and its picture or company sleeve is by using a scanner. Scan the entire single and leave some space around the label. The same applies to the sleeves. Please see the examples below.
- Set your scanner to at least 300 dpi.
- Labels and sleeves must be scanned separately.
- Images of both A and B sides must be included.
- Images of both sides of the picture or company sleeve must be included.
- If there is an insert, include it.
- The spindle hole must have a white background.
- Do not crop — send images of the entire single and sleeve, leaving some “air” around the final image.
- If you do not have a scanner and wish to use a camera, please refer to the guidelines for 10″/12″ singles below.
Scanning the labels
Scanning labels is straightforward. Place your 45 on the scanner, set the resolution to at least 300 dpi, and start the scan. Please send a scan of the entire single, as shown in the first image. This ensures there is enough “air” around the label.
Do not crop or adjust the image, as shown in the second example below.


Scanning the sleeve
The same principles apply when scanning sleeves. Make sure there is some “air” around the scanned sleeve, as shown in the first image.
Do not scan the sleeve with the single inside, as shown in the second example.


10/12″ Images
10″ and 12″ singles and sleeves are often too large for scanners, so a camera or a good phone camera will suffice. Make sure to take photos at a 90-degree angle to maintain the correct perspective. Place a piece of white paper behind the spindle hole to improve the overall look, and leave some “air” around the labels and sleeves.
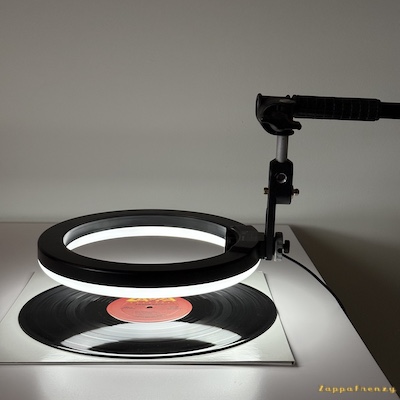
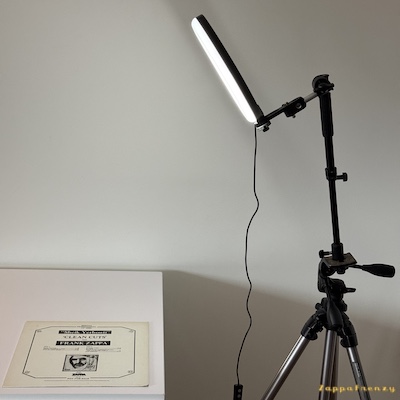
Most phones have grid and level settings — these are very helpful when photographing records. Try to avoid glare and reflections on both records and sleeves. Experimenting with lighting can greatly improve your results. See the examples below for how I use a ring light.
- Use a high-quality setting on your camera or phone.
- Both A and B sides must be included.
- Both sides of the sleeve must be included, and any printed inner sleeve should also be included.
- If there is an insert, include it.
- The spindle hole must have a white background.
- Do not crop — send images of the entire label and sleeve, leaving some “air” around the final image.
Photographing the labels
Photographing labels can be challenging due to reflections. The first image shows how a label photo should look: minimal or no reflections, and enough “air” around the label to allow for editing. Remember to rotate and align the label correctly before taking the photo.
The second image shows the same label, but with visible reflections caused by improper lighting.
The third and fourth images demonstrate how I use a ring light to photograph both labels and sleeves. When photographing a label, keep the ring light just a few centimeters above it.


Photographing the sleeve
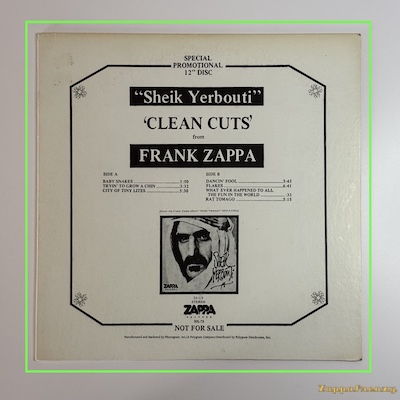
The first image below shows how to photograph a sleeve correctly. The camera is positioned at a 90-degree angle to maintain the correct perspective. Notice how the green line follows the edges of the sleeve, and how there is enough “air” around it to allow for easy editing.
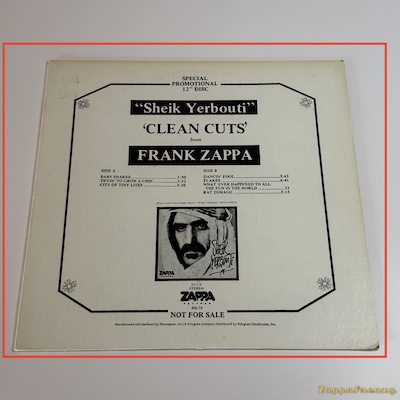
The second image shows an incorrect setup. The camera is not positioned at a 90-degree angle, the sleeve does not appear flat, and it clearly does not follow the red line.
Runouts and Material
Runout information must be included. Please transcribe it exactly as it appears, whether stamped or etched into the vinyl. Be sure to specify which parts are stamped and which are etched. Here is an example of how to list runouts:
Runout A: M-17611-1C TI (stamped; TI is etched)
If there are special symbols or characters that are difficult to distinguish or cannot be reproduced using a keyboard, please take a photo and include it. Experimenting with lighting and camera angles is crucial when photographing runouts.
Please also determine which material was used for manufacturing the single. US 7″ singles were produced in both vinyl and styrene. If you are unsure about the material, please refer to the Vinyl vs Styrene guide.
The first image shows the “S” found on MGM Record Manufacturing Division, Bloomfield pressings, and the second shows the Artisan Sound Recorders logo.


How to send images and information to ZappaFrenzy
Head over to the Contact section and send me a message to let me know that you would like to contribute.